Webhooks
Webhooks are HTTP requests being sent to a URL of your choice, every time a form is being submitted. You can use it in various ways:
- Run custom code on your server or on serverless, such as AWS Lambda, Google function or Cloudflare workers
- Trigger an integration platform such as Make, Integrate.io or Pabbly (Or Zapier, but we have a separate app for that)
- Integrate directly with a 3rd party service that you use, which is able to accept webhooks
Form-Data webhooks are powerful because you can transform the payload and even add headers
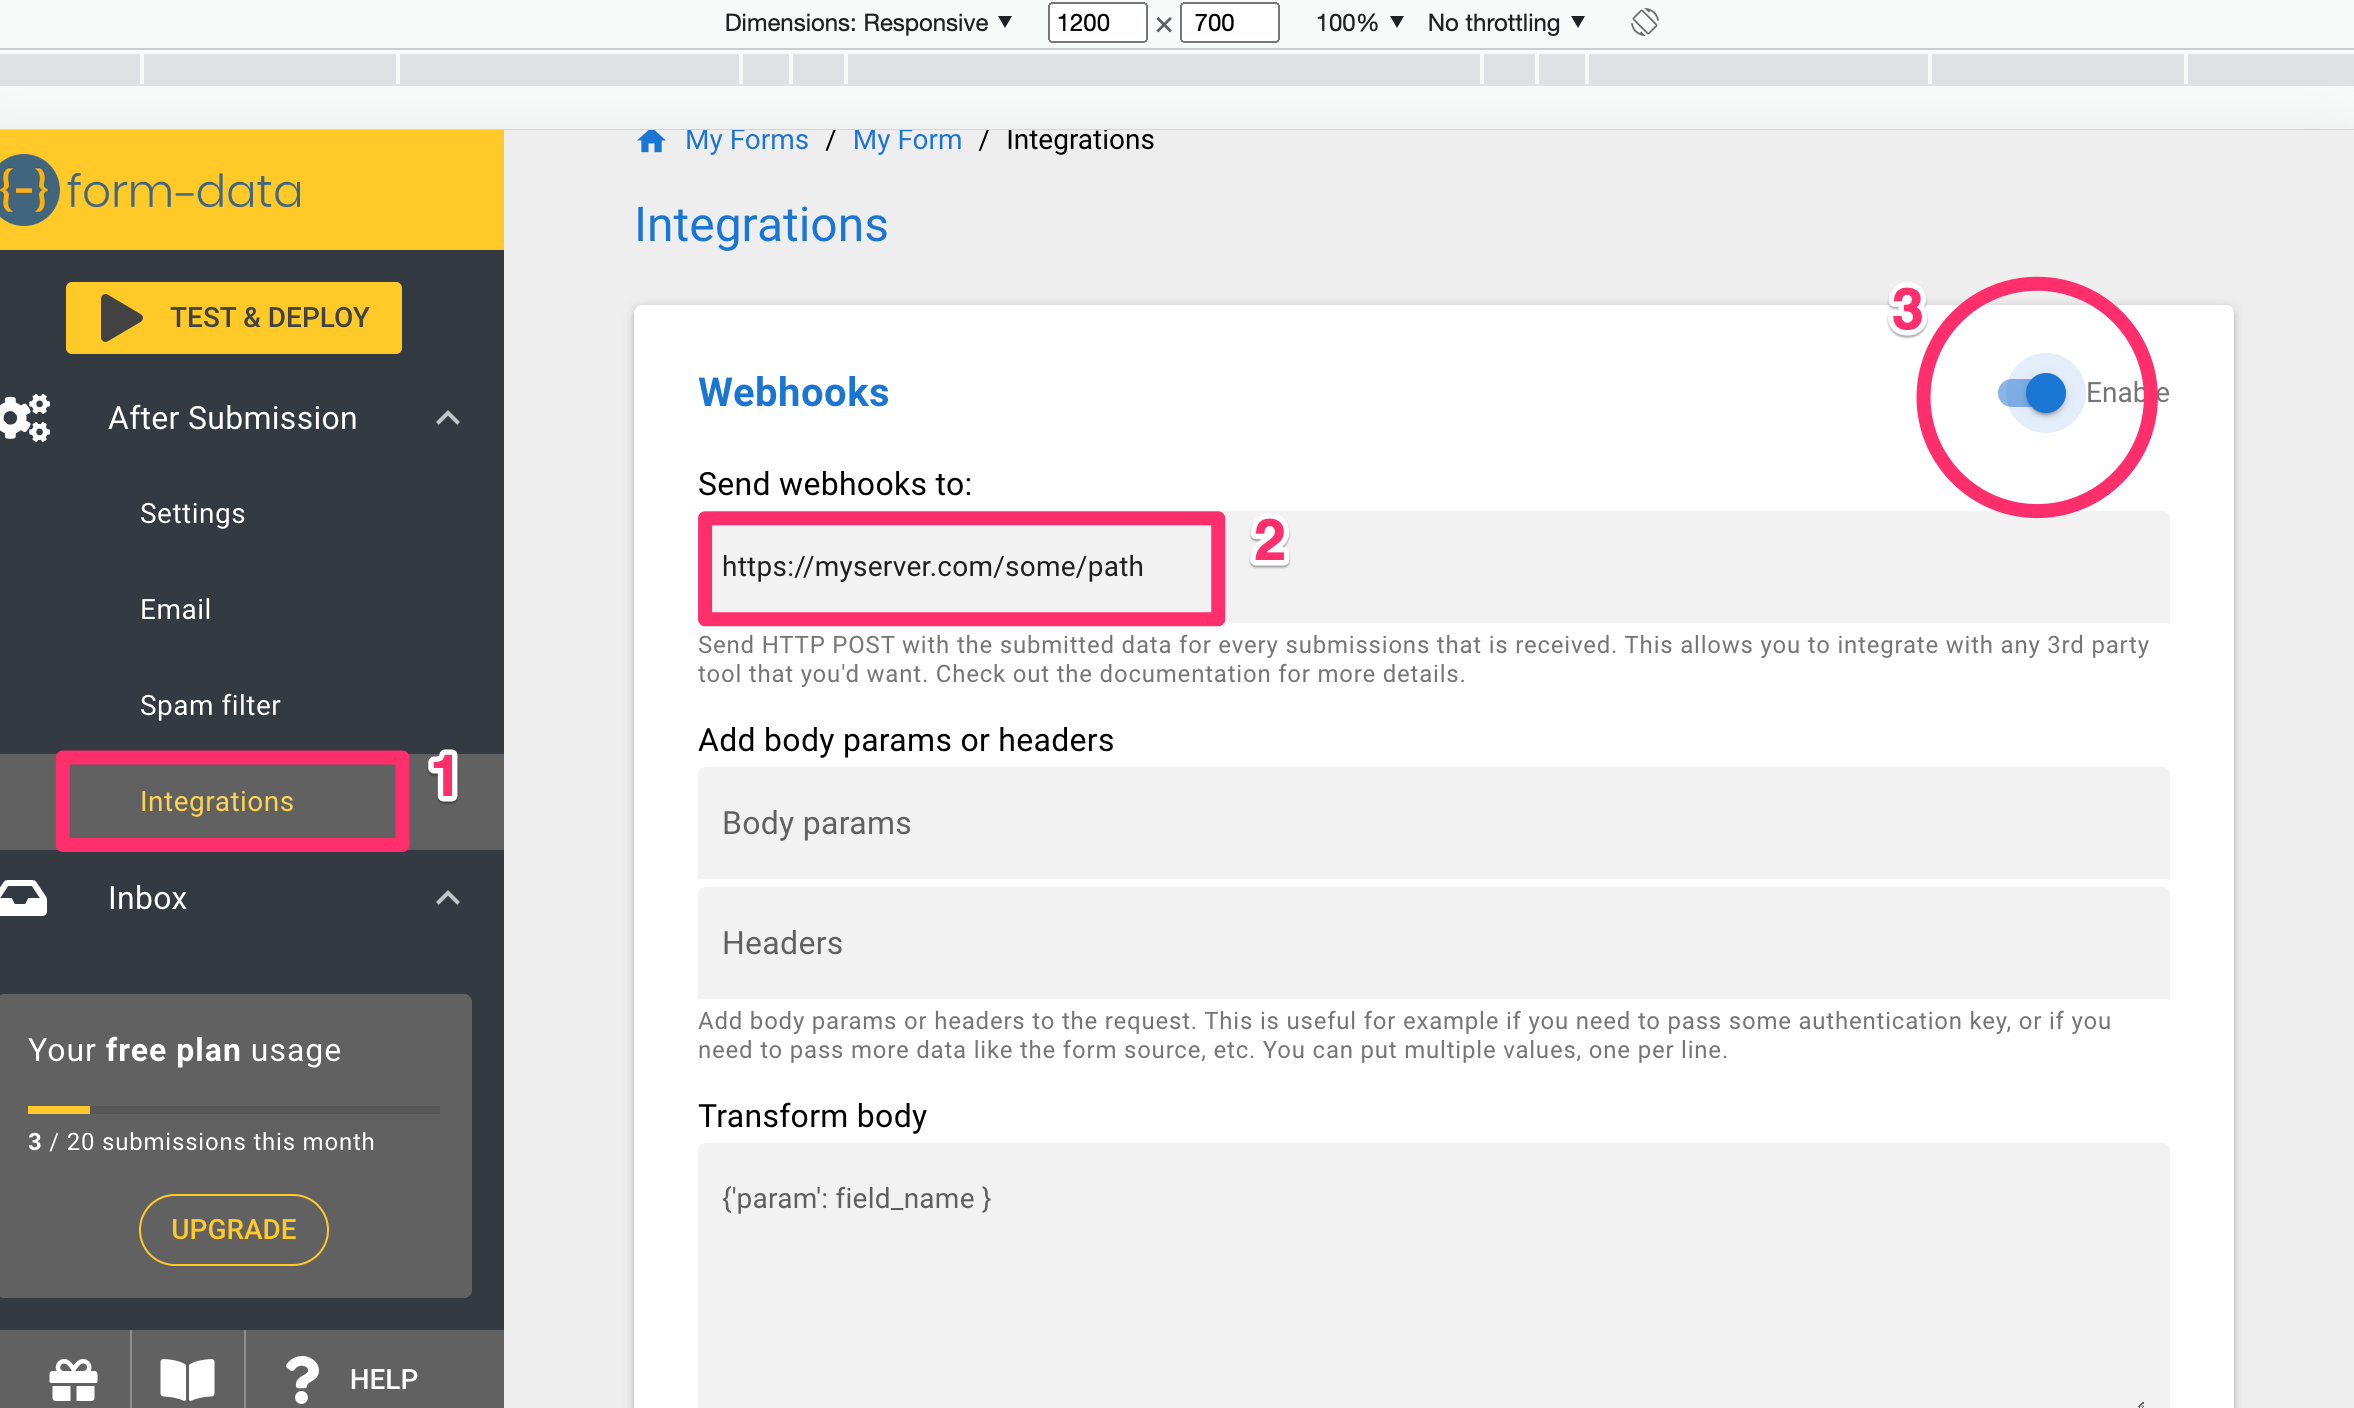
To create a webhook:
- Click Integrations menu ⓵
- Enter the URL where the webhook will be POSTed ⓶
- Enable the Webhooks toggle ⓷
Validating webhook integrity
Because the webhook is calling a URL that is open to the Internet, basically anyone can call that URL and impersonate to Form-Data.
To make sure that the webhook was indeed received from Form-Data:
- Use only HTTPS URLs. HTTP URLs can easily be intercepted, the payload might be changed by a man in the middle, or a fake payload might be sent.
- Verify the webhook signature. To do that, read the following section.
Verifying webhook signature
The webhook is POSTed with a header named x-signature. That header contains a signed JWT token.
In order to verify the signature:
- At the bottom of the Webhooks section you'll see
Webhook secret. Copy it. - In your code, use a JWT library that can verify a JWT signature. Such libraries exist for any language that you use. See here
- Using the library and the secret, verify the JWT signature and expiry.
Note
Signatures are valid for 10 minutes. If you are testing your code over and over with the same signature, at some point you'll have to generate a new sample to work with.
- Once you'll get the parsed token, verify that it contains a key named
formidthat contains the ID of your form. Theidis the last part of the form-handler URL. E.g., in the following URL it'd behttps://api.form-data.com/f/XXXX
Code example
// In your project, run: npm install jsonwebtoken

import jwt from 'jsonwebtoken';

function verifyToken(token) {
    const secret = 'WEBHOOK_SECRET_FROM_FORM-DATA'; // Don't put it in your code like that. Use environment variables or a vault
    const formId = 'MY_FORM_ID'; // Copy it from the last part of your URL
    try {
        const decoded = jwt.verify(token, secret);
        if (decoded.formid !== formId) {
            //invalid token
            return false;
        }
        //everything is good
        return true;
    } catch (err) {
        //invalid token
        return false;
    }
}

// use like this:
const token = request.headers.get('x-signature')
if (!verifyToken(token)) {
    // abort handling of the webhook
    return;
}
// do something with the webhook here
The webhook request
- The webhook is sent as a
POSTrequest to the provided URL. - The
Content-Typeheader isapplication/json - The body is a JSON object. The keys are the
names of the fields in your form, and the values contain the submitted data.
Adding body params and headers
There are some cases in which you'd like to add body params or headers. For example:
- You are posting the webhook to a 3rd party service, and it expects an authentication key.
- You are using the same endpoint to handle webhooks from multiple forms, and you need to pass the source of the request
To add body params or headers use the respective fields in the Webhooks configuration.
You can add multiple params or headers separated by new-line (enter).
Each line should have the format key:value. No quotes, commas or brackets are needed.
Transforming the body
You can use webhooks to integrate directly with a third party service. However, in some cases that service might expect a certain structure that does not match the structure of your form. Using this feature you can adjust the structure to match the service requirements.
The transformation instructions are using a syntax called JSONata. You can read the full documentation there, but we'll give the gist here.
- Describe the desired structure in a JSON format
- Any quoted string is treated as literal.
- Any unquoted string is treated as a reference to the original submitted data.
Example: Let's say the submitted data looks like this:
{
   "email": "wile.e.coyote@gmail.com",
   "fullname": "Wile E.Coyote",
   "message": "Please provide a price quote for a giant rubber band."
}
And let's say the service that you're calling needs the data in the following format:
{
   "user": {
      "e-mail": "wile.e.coyote@gmail.com",
      "name": "Wile E.Coyote"
   },
   "auth_key": "auth_integration_key"
}
The following transformation will provide the desired result:
{
  "user": {
    "name": fullname,
    "e-mail": email
  },
  "auth_key": "auth_integration_key"
}
Note the following:
"name"and"e-mail"as keys are quoted, and therefore created as literal keysfullnameandemailas values are not quoted, and therefore interpreted as the values provided in the form submissions"user"is a new key that wraps"name"and"e-mail"and appears as-is in the result"auth-key"is a new parameter that is added with the static value"auth_integration_key", which is also quotedmessagewas not included in the transformation instructions, and therefore omitted from the result.
Testing your webhook
Before you start development, you'd probably want to see how the webhook's payload and headers look like. The easiest way to do this is to use a service that gives you an endpoint that you can point your webhook to. We suggest using Beeceptor which is free and does not require registration. You can follow these steps:
- Go to Beeceptor.com, and choose a subdomain. Let's say you chose
fooTest1020.free.beeceptor.com - After clicking Create Endpoint you will get to a page that is waiting for a request to be made to that endpoint. Leave the tab open and head over to your form settings in Form-Data
- Navigate to Integrations, enable the webhooks toggle, and paste the webhook URL that you picked into Send webhooks to input box. Save.
- Now you have to submit your form. If you don't yet have a form, you can go to Test & Deploy, and click Test form handler at the top. You'll get a demo form that you can use to test everything.
- Head back to Beeceptor tab that you have left open. You should see a line saying
POST /. Click it, and you should see the request body. You can also click View Headers to see the signature header. - Don't forget to remove the webhook URL that you have created in step 3 once you finish your test.